7 Lesser-Known Techniques to Make Your Fall Wreath Last 3 Times Longer

Ads
These seven proven techniques will dramatically extend your fall wreath’s lifespan through proper storage, climate management, preservation treatments, and seasonal care strategies.
Fall wreaths bring warmth and seasonal charm to any home, but many homeowners watch their beautiful decorations wilt, fade, or crumble within weeks. The secret to 7 Lesser-Known Techniques to Make Your Fall Wreath Last 3 Times Longer Than Standard Options lies in understanding the science behind natural materials and applying targeted preservation methods. Whether you craft your own wreaths or invest in premium store-bought pieces, these techniques will transform how you approach seasonal decor.
Understanding Why Fall Wreaths Deteriorate Quickly
Before diving into preservation techniques, it’s essential to understand what causes fall wreaths to deteriorate. Most fall wreaths combine natural elements like dried leaves, pinecones, berries, and dried flowers. These materials retain moisture even after drying, making them susceptible to humidity, temperature fluctuations, and physical handling.
The primary enemies of fall wreaths include excessive moisture that leads to mold, dry heat that causes brittleness, direct sunlight that fades natural pigments, and improper storage that crushes delicate components. By addressing these factors systematically, you can significantly extend your wreath’s display life.
Common Causes of Premature Wreath Damage
- High indoor humidity levels above 50% promote mold growth
- Heating system cycles create alternating expansion and contraction
- Direct sunlight exposure breaks down chlorophyll and natural dyes
- Physical handling transfers oils that accelerate deterioration
Understanding these factors helps you make informed decisions about placement and care throughout the season.

Technique 1: Strategic Placement and Climate Control
The location where you display your fall wreath dramatically impacts its longevity. Most people make the mistake of hanging their wreaths in areas with fluctuating temperatures or excessive moisture exposure. Instead, aim for consistent, moderate conditions that mimic a controlled environment.
Interior doors away from frequently opened exterior doors work best. Avoid placement near kitchens where steam and cooking odors can penetrate natural materials. Bathrooms, despite their seasonal charm potential, typically have too much humidity for extended wreath display. The ideal location maintains temperatures between 60-72°F with humidity below 45%.
Optimal Display Locations
- Interior hallway doors away from drafts
- Living room walls with consistent climate control
- Covered porches protected from direct weather exposure
- Areas away from heating vents and air conditioning ducts
If you must display your wreath on an exterior door, consider using a protective glass case or overhang. Some homeowners successfully use wreath covers specifically designed for outdoor use, though these typically allow for shorter display periods than indoor placement.
Technique 2: Pre-Display Preparation and Treatment
What you do before hanging your wreath sets the foundation for its entire display life. Proper preparation involves several steps that many DIY enthusiasts and even some professionals overlook. This technique focuses on treating your wreath before it ever meets your door.
Start by lightly misting your wreath with a mixture of water and glycerin. Glycerin, available at most craft stores, helps natural materials retain flexibility and moisture. Mix one part glycerin with two parts water in a spray bottle. Lightly mist the entire wreath, allowing it to dry completely before hanging. This treatment particularly benefits dried flowers and leaves that might otherwise become brittle.
For wreaths containing dried berries or fruits, consider applying a thin coat of clear acrylic spray. This seals the surface while maintaining the natural appearance. Hold the spray can approximately 12 inches away and apply light, even coats. Allow proper drying time between applications to prevent dripping or pooling.
Essential Pre-Treatment Steps
- Inspect thoroughly for pests or eggs before bringing indoors
- Remove any damaged or discolored elements
- Apply glycerin treatment 24 hours before display
- Test spray products on a small hidden area first
Taking these preparation steps might seem time-consuming, but they typically add weeks or even months to your wreath’s attractive display life.
Technique 3: Professional-Grade Preservation Sprays
Beyond basic glycerin treatments, several professional-grade products can dramatically extend your fall wreath’s lifespan. These specialized formulations create a protective barrier while allowing the natural materials to breathe. Understanding which products work best for different materials helps you make informed purchasing decisions.
UV-resistant sprays protect against sunlight damage, which is particularly important for wreaths displayed near windows or in bright entryways. Anti-static sprays reduce dust accumulation, a common problem that makes wreaths look worn long before they actually deteriorate. Water-repellent sprays provide a moisture barrier without creating a plastic appearance.
When selecting products, look for those specifically formulated for dried flowers and natural materials. Avoid products containing harsh chemicals that might discolor or damage sensitive elements. Some crafters successfully use hair sprays as an alternative, though these typically provide shorter protection periods than dedicated preservation products.
Technique 4: Ongoing Maintenance During Display
Even with perfect placement and initial treatment, your fall wreath requires some attention during its display period. Regular maintenance catches small problems before they become major issues and keeps your wreath looking fresh throughout the season. This technique focuses on the care routines that extend display life without requiring significant time investment.
Dust accumulation makes wreaths appear faded and neglected. Use a soft brush attachment on your vacuum cleaner or a can of compressed air to gently remove dust from all surfaces. Work from top to bottom, using light strokes to avoid dislodging delicate elements. For wreaths with loose elements, consider using a hairdryer on its lowest cool setting from a distance of 12 inches.
Inspect your wreath weekly for signs of damage or deterioration. Remove any fallen elements promptly to prevent them from affecting surrounding materials. If you notice mold spots, address them immediately with a cloth dampened with rubbing alcohol. Catching mold early prevents it from spreading and ruining entire sections of your wreath.
Weekly Maintenance Checklist
- Gently dust or vacuum accumulated particles
- Inspect for loose elements and secure if needed
- Check for early signs of mold or pest activity
- Rotate wreath slightly for even wear exposure
These quick weekly checks take only a few minutes but can add significant time to your wreath’s attractive display life.
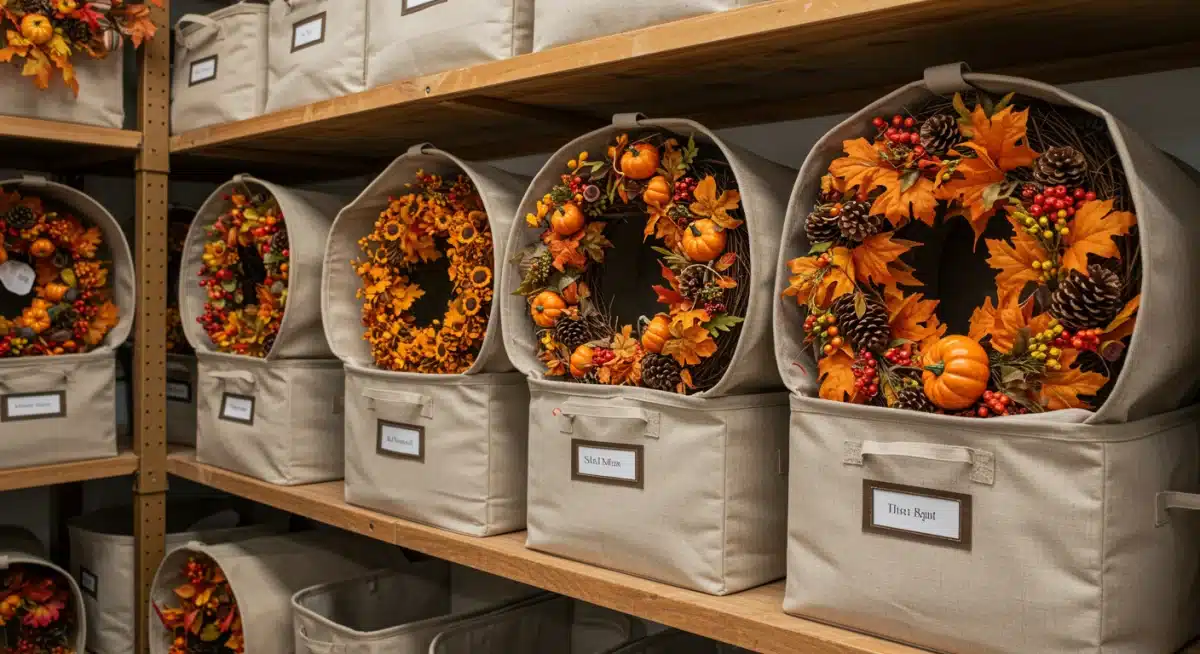
Technique 5: End-of-Season Proper Storage
How you store your fall wreath after the holidays determines whether you can enjoy it again next year. Many people make the mistake of simply tossing their wreaths into boxes or storage bins, only to discover crumbled, damaged decorations when fall arrives again. Proper storage requires attention to several key factors.
Clean your wreath thoroughly before storage. Remove any dust, and check for pests or eggs that might have found their way into the materials during display. Allow the wreath to dry completely if it has been exposed to any moisture. Any remaining humidity during storage promotes mold growth that can destroy your wreath entirely.
Storage containers matter significantly. Avoid plastic bags or airtight containers, which trap moisture and create ideal conditions for mold. Instead, use breathable storage bags made from cotton or linen. Cardboard boxes work well for larger wreaths, though you should line the bottom with acid-free paper to prevent discoloration from cardboard chemicals.
Hang your stored wreaths when possible to maintain their shape. Specialized wreath storage bags often include built-in hangers. If hanging isn’t feasible, lay wreaths flat in storage containers, stacking no more than two wreaths per container to prevent crushing delicate elements.
Storage Best Practices
- Clean and dry thoroughly before storing
- Use breathable containers rather than plastic
- Store in a cool, dry location away from direct light
- Add silica gel packets to absorb excess moisture
Proper storage can extend your wreath’s life for multiple seasons, making the investment in quality pieces worthwhile.
Technique 6: Selecting Naturally Durable Materials
The materials you choose when purchasing or creating fall wreaths significantly impact their potential longevity. Some natural elements inherently last longer than others, even under identical conditions. Understanding which materials offer the best durability helps you make smarter purchasing decisions.
Pinecones and dried seed pods typically remain intact for years with minimal care. Preserved moss and lichen also show remarkable durability, maintaining their appearance through multiple seasons. However, fresh dried leaves and natural berries often deteriorate more quickly, even with optimal care.
When shopping for fall wreaths, examine the construction quality and materials used. Hand-tied wreaths typically last longer than those assembled with hot glue, as the ties allow for some flexibility during handling. Wreaths featuring silk or preserved flowers alongside natural elements often balance aesthetics with durability more effectively than those using only natural materials.
Consider investing in higher-quality pieces constructed with durability in mind. While these might cost more initially, their extended lifespan often provides better value over time than cheaper alternatives that require annual replacement.
Most Durable Fall Wreath Materials
- Pinecones and birch bark elements
- Preserved or dried moss and lichen
- Artificial silk flowers and leaves
- Natural wood elements and branches
Mixing durable natural elements with quality artificial components often provides the best balance of aesthetics and longevity.
Technique 7: Advanced Restoration and Repair Methods
Even with excellent care, some deterioration is inevitable over time. Knowing how to restore and repair your fall wreath can extend its useful life significantly. These advanced techniques address common problems that typically cause wreath owners to discard their decorations prematurely.
Faded elements can often be refreshed with appropriate products. Dried flowers that have lost their color can sometimes be re-dyed using flower染色剂 available from craft suppliers. For natural elements that have become brittle, a light application of hairspray can add some flexibility and help elements hold together longer.
Loose elements can be secured using various techniques depending on the wreath construction. Floral wire works well for reattaching elements to wire-frame wreaths. Hot glue provides stronger bonds for foam-based wreaths, though this approach is less reversible. For valuable or sentimental wreaths, consider consulting a professional florist who can perform repairs using industry-standard techniques.
Replacing damaged elements extends wreath life considerably. Keep spare elements from your original wreath or purchase matching supplies for repairs. This approach works particularly well for wreaths featuring berries, small flowers, or decorative accents that might become damaged while more structural elements remain intact.
Quick Fixes for Common Problems
- Loose elements: Secure with floral wire or small dots of hot glue
- Faded color: Light mist with diluted fabric dye or flower染色剂
- Brittle sections: Apply light coat of flexible hold hairspray
- Missing pieces: Replace with matching spare elements saved from original
These restoration techniques can add additional seasons to wreaths that might otherwise be discarded.
| Technique | Key Benefit |
|---|---|
| Strategic Placement | Protects from humidity and temperature fluctuations |
| Pre-Display Treatment | Conditions materials for extended display life |
| Preservation Sprays | Creates protective barrier against moisture and UV damage |
| Proper Storage | Enables multiple season reuse without damage |
Frequently Asked Questions
With proper care, a fall wreath can last 3-5 months during display season and multiple years when stored correctly between seasons. The techniques outlined above can triple the standard lifespan compared to basic care methods. High-quality wreaths with durable materials may last even longer with optimal maintenance.
Real fall leaves can be preserved using glycerin treatments or pressing methods, but they typically don’t last as long as artificial or dried alternatives. Consider using preserved oak leaves, maple leaves that have been professionally dried, or high-quality silk leaves that mimic natural varieties. These options provide the aesthetic benefits of real leaves with significantly extended durability.
Use a soft brush attachment on your vacuum cleaner for light dusting, or gently shake the wreath outdoors to remove loose particles. For deeper cleaning, use a can of compressed air held 6-8 inches away. Avoid water or cleaning solutions unless specific elements are designed to get wet, as moisture can damage dried materials and promote mold growth.
Hanging storage is generally preferable as it maintains the wreath’s shape and prevents crushing delicate elements. Specialized wreath storage bags with hangers work excellently for this purpose. If you must store flat, place the wreath in a breathable container with acid-free tissue paper between layers, and avoid stacking more than two wreaths together to prevent damage from weight.
Ideal humidity for fall wreath display is between 35-45%, with storage humidity slightly lower at 30-40%. High humidity above 50% promotes mold growth, while very dry conditions below 25% can cause materials to become brittle and crumble. Use a hygrometer to monitor levels in your display and storage areas, and use silica gel packets in storage containers to control moisture.
Conclusion
Extending your fall wreath’s lifespan requires attention to placement, preparation, maintenance, and proper storage. By implementing these seven lesser-known techniques, you can enjoy your seasonal decorations for three times longer than standard care methods provide. The investment of time and effort pays dividends through reduced replacement costs and the satisfaction of maintaining beautiful, lasting decorations throughout the fall season and beyond.


